A carrot starts choosing its final shape only days after germination. Once the young taproot hits a stone, a compacted layer, a fertilizer pocket, or the bottom of a shallow pot, that clean downward path is gone. The root may split, turn sideways, grow short, or develop a mop of fine side roots.
- Why Carrots Fork, Bend, and Stop Short
- Match the Carrot Variety to the Available Root Space
- Measure Usable Depth, Not the Outside of the Pot
- Prepare an Even Root Zone
- For Containers
- For Raised Beds
- Create a Fine Seedbed Over a Deeper Root Run
- Sow Carrots Where They Will Finish Growing
- Keep the Surface Moist During Germination
- Thin Seedlings Before Their Roots Become Entangled
- Keep Moisture Steady, Not Constantly Wet
- Use Fertilizer With Restraint
- Use the Harvested Shape to Find the Problem
- Know When the Trouble Is More Than a Stone
- Pull a Test Carrot Before Harvesting the Whole Planting
- Reset the Root Path Before the Next Sowing
- Frequently Asked Questions
- Can a Bent Carrot Straighten as It Grows?
- Can Carrot Seedlings Be Transplanted?
- Do Carrots Need Sand to Grow Straight?
- How Deep Should a Container Be for Carrots?
- Why Are My Carrots Straight but Very Thin?
- Why Are the Carrots Near the Edge Smaller?
That is why learning how to grow straight carrots in containers and raised beds has less to do with buying special fertilizer and more to do with preparing an open, even column of soil. Variety, usable depth, seed placement, thinning, moisture, and soil structure all need to match. Get those pieces reasonably close—not perfectly, just consistently—and straighter roots follow.
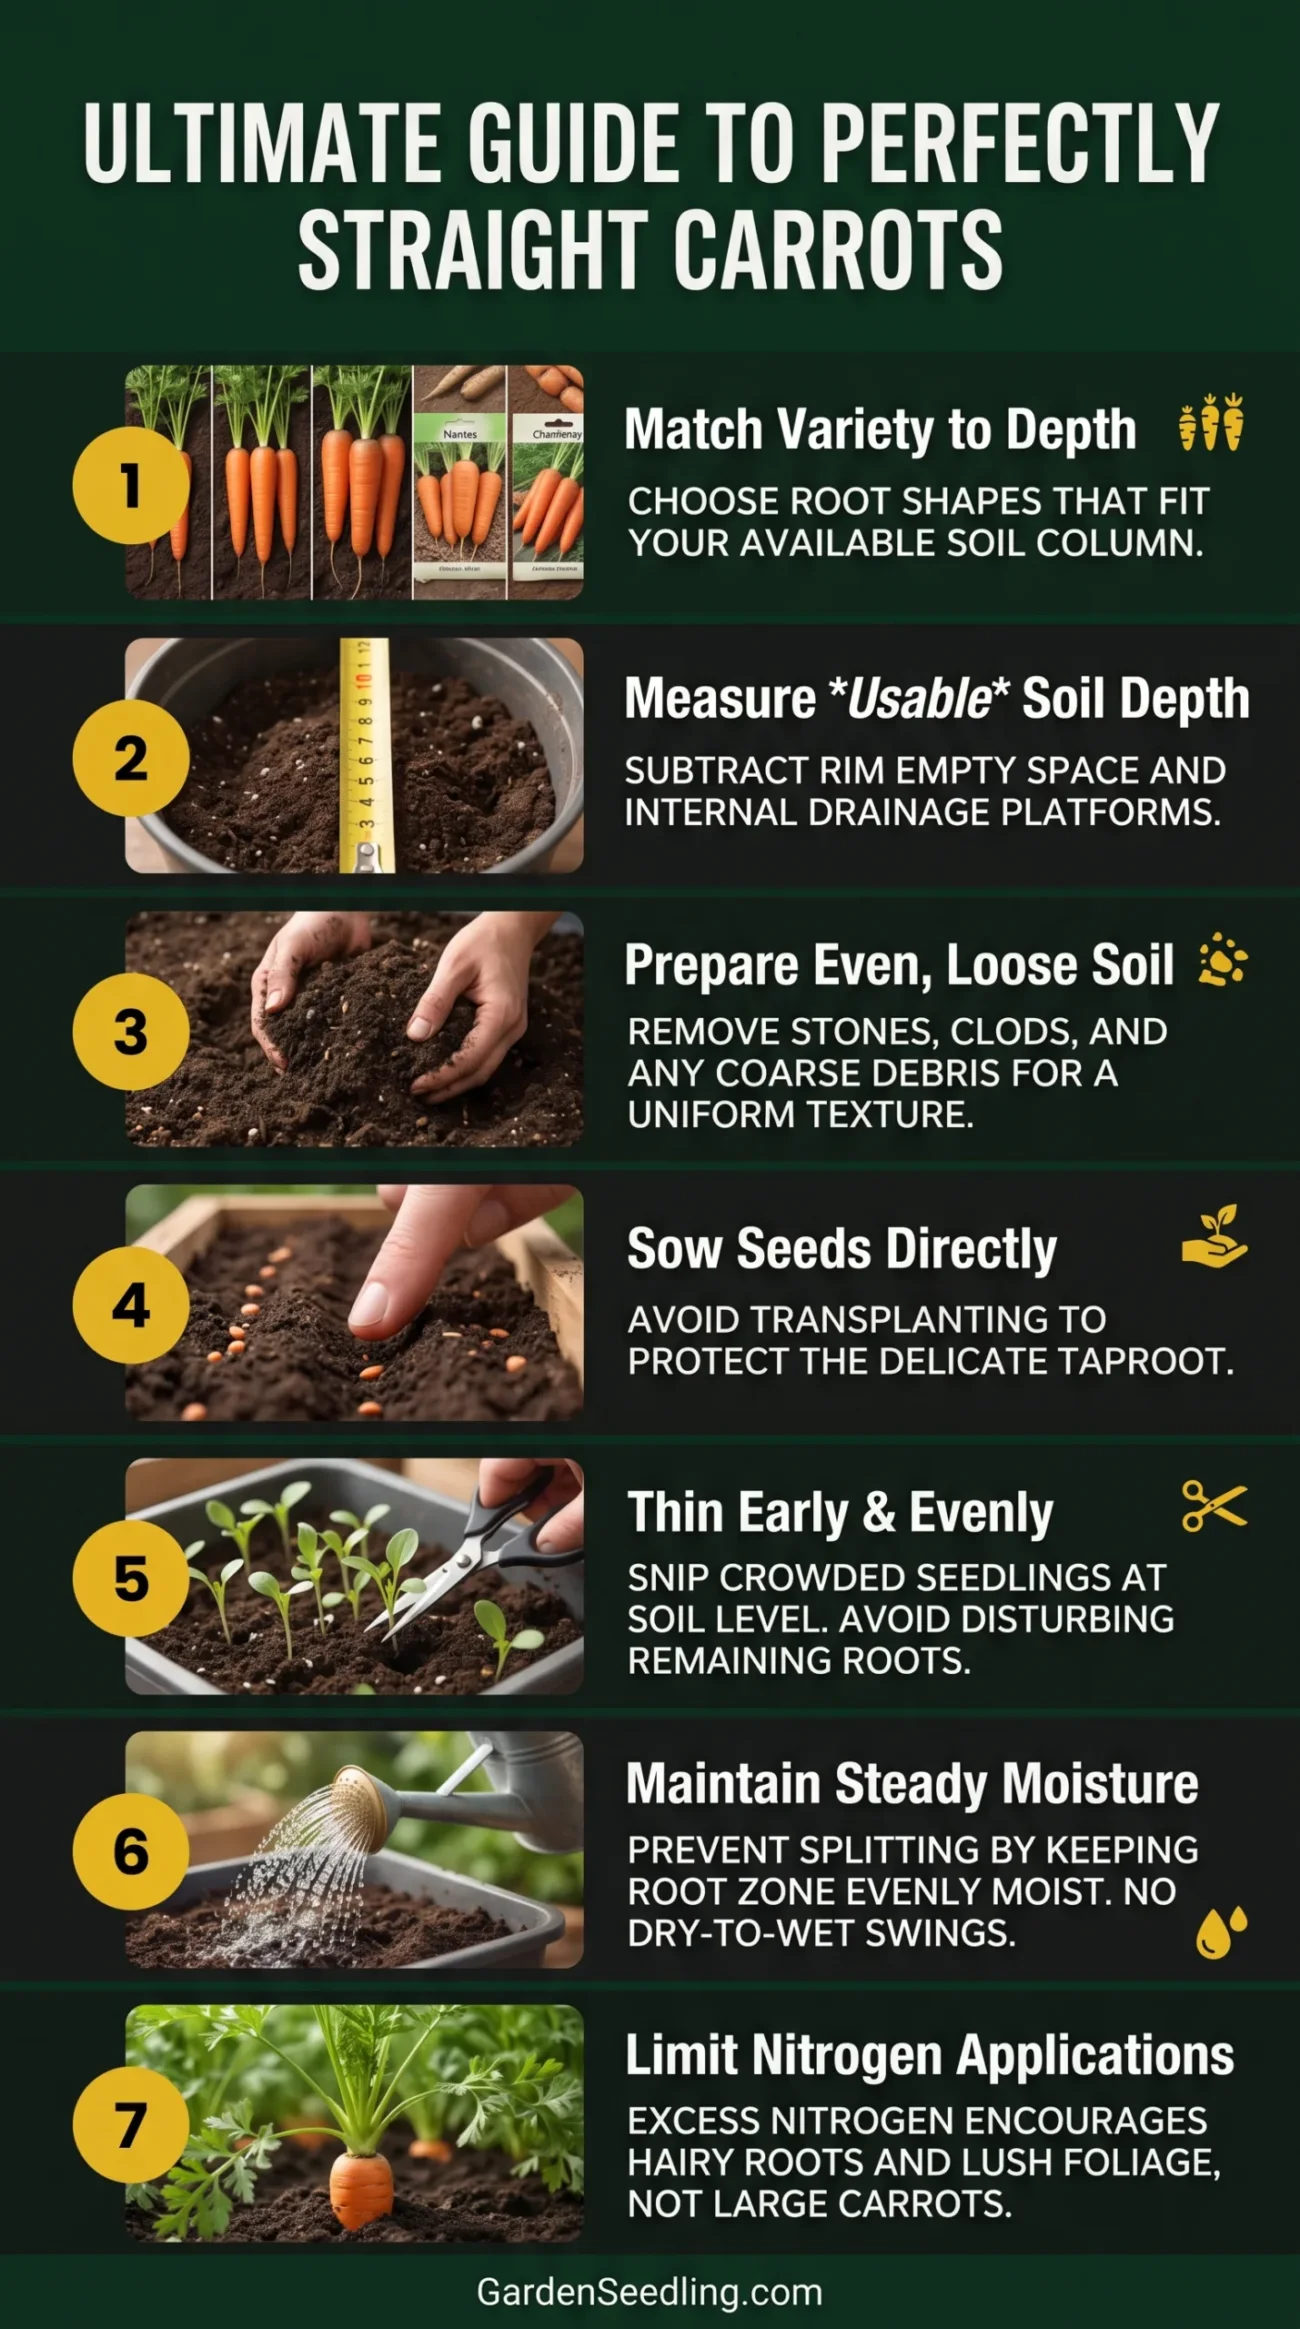
For straighter carrots: choose a root shape that fits the available depth, sow directly where the plants will mature, remove stones and coarse debris, thin seedlings early, avoid fresh manure, and keep the root zone evenly moist without leaving it waterlogged.
Why Carrots Fork, Bend, and Stop Short
The edible part of a carrot is an enlarged taproot. Its growing tip pushes down through the soil while the upper section gradually thickens. When that tip meets resistance, the plant does not wait for someone to fix the bed. It adapts.
A small stone can divide the growing tip and produce a forked carrot. A hard soil layer may create a short, blunt root. A container base can turn a long carrot sideways. Damage during transplanting or rough thinning may split the tip before the root has grown more than an inch.
Some causes are physical. Others come from how the soil is managed.
- Forked roots: stones, coarse compost, root-tip injury, concentrated fertilizer, fresh manure, nematodes, or root disease.
- Bent roots: a solid obstruction, the wall of a crowded pot, or the bottom of a container.
- Short roots: shallow soil, compaction, an unsuitable long-rooted variety, or poor growing conditions.
- Hairy roots: excess nitrogen, overly wet soil, root stress, or delayed harvest.
- Split roots: a dry period followed by heavy watering or prolonged maturity in the soil.
A misshapen carrot is usually safe to eat if it remains firm and free from decay. Still, its shape gives useful evidence. Read it like a record of what happened underground.
Match the Carrot Variety to the Available Root Space
Start with the mature root shape printed on the seed packet. The name alone can mislead. A variety described as a “container carrot” may still need more depth than a shallow window box provides, while a short conical type may grow well in a modest pot.
Long, tapered carrots need the deepest uninterrupted soil. Cylindrical Nantes-type carrots usually need less depth, though they still require an even root zone. Chantenay-type carrots tend to be shorter and broader. Round and mini varieties fit the shallowest spaces.
| Root Form | Best Growing Space | Common Problem | What to Check |
|---|---|---|---|
| Long and tapered | Deep containers or deeply prepared raised beds | Bent or blunt tips | Mature root length and soil depth |
| Medium and cylindrical | Most medium-to-deep pots and raised beds | Crowding and uneven thickness | Final plant spacing |
| Short and conical | Standard vegetable containers | Excessive branching | Fertilizer and coarse debris |
| Round or mini | Wide, relatively shallow containers | Overcrowding | Seed distribution and thinning |
For long carrots, allow more soil depth than the expected mature root length. A carrot listed as 8 inches long should not be placed in exactly 8 inches of usable soil. The root needs room below, and potting mix often settles after the first few waterings.
Measure Usable Depth, Not the Outside of the Pot
A container sold as 12 inches tall may provide only 9 or 10 inches of actual root space. The rim remains partly empty for watering, the bottom may curve upward, and loose potting mix shrinks after it becomes wet.
Measure from the inside bottom of the container to the final soil line. Then subtract any area that roots cannot use.
Container Depth Check
Usable soil depth = internal container depth − empty rim − compacted or raised bottom area
Root clearance = usable soil depth − expected mature carrot length
A positive number gives the root some working room. A number close to zero means the fit is tight.
Watch for containers with false bottoms, internal drainage platforms, or thick reservoirs. Self-watering pots can grow carrots well, but the reservoir reduces the depth available for roots. Measure the soil chamber itself.
Width matters too. A narrow pot may be deep enough for one row, yet it can dry quickly and crowd the outer roots against the wall. For most home plantings, a wider container gives steadier moisture and more even spacing.
Prepare an Even Root Zone
Carrots do not need soil that feels like powder. They need soil that offers similar resistance from the surface to the bottom. A soft upper layer placed over dense soil creates a hidden barrier, much like a thin rug laid over concrete.
The finished mix should drain freely, hold moderate moisture, and break apart without forming hard clods. Remove stones, large bark chips, thick roots, sticks, and half-decomposed chunks of organic matter.
For Containers
Use a light potting mix rather than digging heavy yard soil into a pot. Garden soil often compacts after repeated watering and may drain poorly when confined by container walls.
A suitable carrot mix can contain finished compost, fine-textured potting mix, and an aeration material such as perlite. The exact ratio matters less than the final structure. Squeeze a moist handful. It should hold loosely for a moment, then crumble when pressed with a finger.
- Remove large pieces: screen out bark chunks, stones, and woody compost fragments.
- Fill in layers: add a few inches at a time and settle the mix gently with your hands.
- Do not pack it down: firm enough to remove large air pockets, no harder.
- Water before sowing: this exposes settling and allows you to top up the container.
Avoid filling the lower half with dense soil and the upper half with fluffy potting mix. Roots often stop, bend, or branch where the texture changes sharply.
For Raised Beds
Raised-bed soil can look perfect at the surface while hiding a compacted layer underneath. Probe the bed before planting. Push a thin stake, soil probe, or straight metal rod down at several points, including the corners and center.
If the rod stops at the same depth across the bed, inspect that layer. It may be compacted native soil, landscape fabric, old cardboard, a mat of grass roots, or construction debris.
Raised-bed warning: a six-inch wooden frame does not automatically provide six inches of usable carrot soil. Long-rooted varieties may continue into the native ground below, so that lower layer must also be loose and free of obstacles.
If the bed has no solid bottom, loosen the native soil below before filling it. Blend the boundary lightly so roots do not meet an abrupt change from soft soil to hard ground.
Create a Fine Seedbed Over a Deeper Root Run
Carrot seeds are tiny. They need a fine, level surface that stays moist long enough for germination, while the developing roots need deeper, open soil below. These are two related jobs.
Break apart surface clumps and remove pieces that could interfere with shallow sowing. The top half-inch should be smooth enough for even seed placement, but do not repeatedly rake and crush wet soil. That can form a hard crust after watering.
Sow according to the depth listed on the packet, commonly around 1/4 inch. Cover lightly, then press the surface just enough to create contact between the seed and moist soil.
Very lightly. That part matters.
Sow Carrots Where They Will Finish Growing
Direct sowing protects the young taproot. Carrots rarely benefit from being started in trays and transplanted later because even careful handling can bend or damage the root tip.
Place the seed directly in its final container or raised-bed row. If a section germinates poorly, reseed that space rather than moving seedlings from another area. Transplanted carrot seedlings may survive and produce leaves, but their roots often branch or twist.
Seed tape and pelleted seed can make spacing easier, especially in containers where every inch counts. Plain seed works just as well when scattered carefully. Mix it with a small amount of dry sand if you need better visibility, but distribute the mixture immediately so the seed does not settle unevenly.
Keep the Surface Moist During Germination
Carrot seed can take one to three weeks to emerge, depending on temperature and soil conditions. During that period, the shallow seed layer must not dry into a crust.
Use a gentle watering wand, fine rose, or mist setting. A hard stream can move seeds into clumps, expose some, and bury others too deeply. In hot or windy weather, a light board, burlap, or breathable row cover can help reduce surface drying. Remove any solid cover as soon as seedlings begin to appear.
Check beneath the cover daily. Forgotten covers create pale, stretched seedlings—and yes, that happens fast.
Thin Seedlings Before Their Roots Become Entangled
Dense germination looks promising above ground, but crowded seedlings compete below it. Their roots may press against one another, curve sideways, or stay thin because they lack room to expand.
Begin thinning when the seedlings are easy to distinguish and have developed their first true leaves. Final spacing depends on the variety, though many carrots perform well with roughly 2 to 3 inches between plants. Large storage types may need a little more space.
Instead of pulling every unwanted seedling, snip crowded seedlings at soil level with small scissors. Pulling can disturb the roots of the plants you plan to keep, especially when the soil is dry or the seedlings grow in tight clusters.
- Thin early: do not wait until the roots begin swelling.
- Keep spacing even: one large gap does not compensate for a crowded cluster elsewhere.
- Work on damp soil: nearby roots move less when the soil has some moisture.
- Do not replant thinnings: use the tops as greens if desired, but leave the remaining carrot roots undisturbed.
Keep Moisture Steady, Not Constantly Wet
Carrots grow straighter when moisture changes gradually. Repeated cycles of bone-dry soil followed by a heavy soaking put stress on the expanding root. This can lead to splitting, uneven growth, and coarse texture.
Containers need closer attention because their outer edges and upper layers dry quickly. Raised beds may hold moisture longer in the center while the sides dry near the wooden or metal frame.
| What You Notice | Likely Moisture Pattern | Adjustment |
|---|---|---|
| Dry surface but wet lower mix | Frequent shallow checking | Test moisture deeper before watering |
| Cracked roots after rain or irrigation | Dry-to-wet swings | Water earlier and more evenly |
| Fine hairy roots | Constant wetness or root stress | Improve drainage and reduce watering frequency |
| Outer carrots smaller than center carrots | Dry container or bed edges | Check moisture near the sides |
Insert a finger or narrow wooden stick several inches into the soil. Water when the upper root zone begins to dry, then apply enough water to moisten the deeper mix. Avoid giving only a small splash each day. That wets the surface but may leave the lower root path dry.
Mulch can help raised beds hold steadier moisture after seedlings become established. Use a thin layer of fine straw, chopped leaves, or another light material. Keep it from burying the small plants.
Use Fertilizer With Restraint
Carrots need nutrients, but rich soil does not guarantee straight roots. Fresh manure and concentrated fertilizer can injure young root tips or encourage excessive side-root growth. Heavy nitrogen feeding may produce lush tops with disappointing roots underneath.
Use fully finished compost rather than fresh manure. If the growing mix already contains fertilizer, wait and observe the plants before adding more. Pale, slow-growing foliage may justify feeding; healthy green leaves usually do not need repeated nitrogen applications.
A large leafy top is not proof of a large carrot. Too much nitrogen can shift growth toward foliage while the root becomes hairy, branched, or undersized.
Never place granular fertilizer in a concentrated band directly beneath the seed row. Mix it evenly through the soil according to the product label, or apply a diluted liquid feed after seedlings become established.
Use the Harvested Shape to Find the Problem
Pulling one misshapen carrot can be bad luck. Pulling twenty carrots with the same bend at the same depth points to a repeatable soil problem.
| Carrot Shape | Possible Cause | Where to Inspect | Next-Sowing Fix |
|---|---|---|---|
| Two or more thick forks | Stone, damaged root tip, fresh manure, fertilizer pocket | Soil near the point where the root divided | Screen the soil and sow directly |
| Short, blunt root | Hard layer or insufficient depth | Container base or soil below the raised bed | Use a deeper root zone or shorter variety |
| Sharp sideways bend | Physical obstruction | The soil depth matching the bend | Remove stones and coarse material |
| Many fine side roots | Wet soil, excess nitrogen, stress, or late harvest | Drainage, feeding, and harvest timing | Reduce feeding and stabilize moisture |
| Twisted or intertwined roots | Crowding | Final spacing between plants | Thin earlier and more evenly |
| Deep split along the root | Sudden heavy watering after dryness | Recent irrigation and weather pattern | Avoid severe drying between waterings |
Know When the Trouble Is More Than a Stone
Not every forked carrot comes from poor soil preparation. When most roots show swelling, knots, dark lesions, tunnels, or rotting tips, look beyond texture and depth.
Root-knot nematodes can cause galls, stunting, and widespread branching. Root diseases favored by wet soil may damage the growing tip and produce short or forked roots. Carrot fly larvae and other soil pests leave tunnels or discolored feeding areas rather than a clean bend around an obstacle.
The pattern helps. One or two damaged roots may point to a stone or local injury. Similar symptoms across an entire container suggest a problem with the mix, watering, fertilizer, or soil-borne organisms. Damage concentrated in one section of a raised bed may follow an irrigation line, old compost pocket, or patch of infested soil.
Do not reuse badly affected container mix without identifying the cause. Replacing a small amount of potting mix is often easier than carrying a root problem into the next crop.
Pull a Test Carrot Before Harvesting the Whole Planting
Days to maturity provide an estimate, not a fixed harvest appointment. Temperature, spacing, sunlight, and variety all affect development.
Brush soil away from the shoulder of one carrot near the edge of the planting. Check its width. Then loosen the soil beside the root with a hand fork or narrow trowel before lifting it vertically.
Do not yank hard on dry, compacted soil. Tops tear. Roots snap.
Inspect the test carrot before harvesting the rest. A well-shaped but undersized root may need more time. A mature root with early cracking may need to come out soon. If the test carrot bends at the container bottom, waiting longer will not straighten it.
Reset the Root Path Before the Next Sowing
A disappointing crop can still improve the next one because every root shape points somewhere. Empty containers completely and inspect the lower mix. Look for compacted layers, drainage screens pushed upward, dense mats of old roots, and coarse pieces that escaped notice during filling.
For raised beds, probe several areas rather than repairing only the spot where one carrot grew. If many roots stopped at the same depth, loosen the full planting area and inspect the layer underneath.
- All roots bend at one depth: increase usable depth or choose a shorter carrot.
- Only scattered roots fork: screen out stones, sticks, and coarse compost.
- Roots are thin and crowded: improve seed spacing and thin earlier.
- Roots are hairy with large tops: reduce nitrogen and check soil moisture.
- Roots split after watering: prevent the bed from becoming extremely dry.
- Roots have knots or lesions: investigate pests or disease before replanting.
Straight carrots usually come from removing interruptions. Less crowding. Fewer hard layers. Gentler watering. A root path that simply keeps going down.
Frequently Asked Questions
Can a Bent Carrot Straighten as It Grows?
No. Once the taproot makes a sharp turn around an obstacle or along the bottom of a pot, later growth usually thickens that shape rather than correcting it.
Can Carrot Seedlings Be Transplanted?
They can survive transplanting, but moving them often damages or bends the taproot. Direct sowing gives a better chance of producing straight carrots.
Do Carrots Need Sand to Grow Straight?
Not necessarily. Adding sand does not automatically improve every soil. Carrots need an even, loose, well-drained root zone without stones or hard clods. In heavy clay, poorly mixed sand can create a dense, concrete-like texture.
How Deep Should a Container Be for Carrots?
The container should provide more usable soil depth than the expected mature root length. Short carrot types may fit in containers around 10 to 12 inches deep, while long varieties need deeper pots.
Why Are My Carrots Straight but Very Thin?
Thin roots often result from crowding, early harvest, low light, weak growth, or a variety that naturally stays narrow. Check spacing first.
Why Are the Carrots Near the Edge Smaller?
Container and raised-bed edges dry faster than the center. Roots near the wall may also meet warmer soil, uneven irrigation, or physical restriction.